[natural ability] to think creatively
Martina S. Villarreal
photographer & storyteller
info@photosbymartina.net
photosbymartina.net
(512) 910-5592
Sunday, October 25, 2015
Austin Wedding Photography: Carlos & Ashley
Sneak peek from Carlos & Ashley's wedding at the Red Barn in Pflugerville, Texas. This adorable couple tied the knot with their friends and family on Oct 23, 2015. Amazingly, this DIY theme wedding was planned in only 3 months. They even had their son as the ring bearer. So sweet! I had so much fun capturing their beautiful and special day. Congratulations to the happy couple!
Thursday, October 8, 2015
Austin Couples Portraits: Yutong & Andy
Sneak preview of a couples portrait session with the lovely young couple, Yutong & Andy. Photos were taken at the East Metropolitan Park in Manor, Texas. They are very sweet and down-to-earth couple. I am happy I had the opportunity to meet and document these moments with them! Here are a few of my favorites from the day.
Monday, September 28, 2015
Lunar eclipse photography
Photos taken on September 27, 2015 during a total lunar eclipse at Georgetown Lake in Georgetown, Texas. A total lunar eclipse can happen only when the sun, Earth and moon are perfectly lined up. The next lunar eclipse will not be visible until the year 2033.
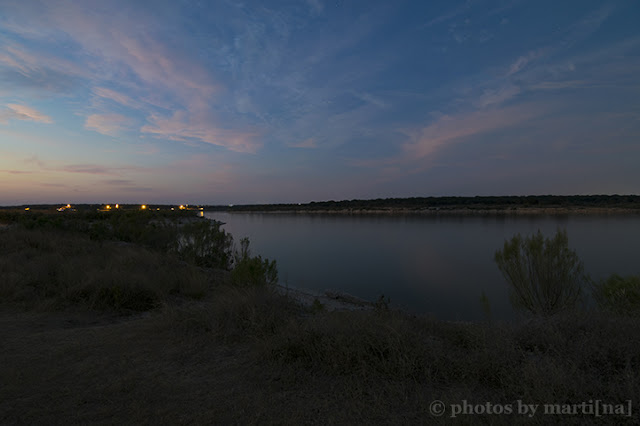 |
| Aperture: f/5.6, Shutter speed: 25 sec, ISO 100 |
 |
| Aperture: f/10, Shutter speed: 30 sec, ISO 200 |
 |
| Aperture: f/13, Shutter speed: 8 sec, ISO 100 |
Sunday, September 13, 2015
Austin Couples Portraits: Elexis & Larry
Sneak preview from a couples portrait session with my dear friends, Elexis & Larry. These two got engaged and are planning a winter wedding. I'm so happy I was able to capture these moments between them. Congratulations you two! We are so happy for you both :) Here are my favorites from the day.
Thursday, September 10, 2015
Inspirational photography quotes
 |
| This quote was inspired by Ansel Adams. |
 |
| The art of story telling & capturing emotion. |
Sunday, August 16, 2015
Austin Couples Portraits: Nikki & Mark
Photos from a couples portrait session at Walnut Creek Park in Austin, Texas. I had the opportunity to get to know and photograph this adorable couple! They were fun to work with and, they are very much in love. Here are my favorites from the day!
Wednesday, August 12, 2015
What to wear at your next portrait session
Here is my top ten list on what to wear at your next portrait session.
1. Remember to wear simple clothes, darker colors work best.
2. Avoid wearing all white, neon colors, busy patterns, bold strips, plaids or polka dots, clothing that’s too tight or too baggy. These all bring more attention to your clothes, rather than your face.
3. Avoid clothing with pictures, writing or large logos on them (for example, graphic t-shirts).
4. For group and family photos, wear similar colors (they don’t all have to match) but be party of the same color family/theme.
5. Pick colors and clothing that’s comfortable and looks good on you.
6. Avoid wearing watches or hair ties around your wrists.
7. Wear minimal jewelry: 2-3 pieces at the most.
8. If possible, remove glasses before the session, as they catch reflections that can cover your eyes.
9. Don’t forget to wear shoes and socks ;)
10. Bring a great attitude to the portrait session. If you are relaxed, and your eyes and smile are genuinely friendly, your portrait will be too!
Tuesday, June 2, 2015
3 things you didn't know your camera could do
If you are like me, learning all the features of your DSLR or Mirrorless camera can seem like an impossible task. There so many options, features, and settings to pick from, especially on the newer models. It seems like there is always something new to learn as the technologies evolve. Below I will discuss three settings you probably didn't know your camera could do that can help improve exposure compensation and your photography skills.
1. Metering - metering is used to help determine exposure. Your camera will balance the exposure based on which area is selected (spot, center, or multi-point). There are three types of modes: spot, center-weight and matrix mode. Spot metering only measures a very small area. It is very accurate and is not influenced by other areas within the frame. It can be useful when shooting very high contrast scenes. Center weight is when the meter focuses towards the central part of the viewfinder. It is less influenced by small, bright areas at the edges of the viewfinder. Matrix (multi-point) metering is the measure of light intensity in several points in the viewfinder and then combines the results to find the settings for the best exposure. This option is located under the custom menu settings.
2. Multiple exposure (bracketing) - many photographers use automatic bracketing to ensure that at least one shot gets exposed properly. This is helpful when you don't have time to adjust the exposure or review the image. It works by shoot the same subject multiple times, slightly varying the exposure settings for each image. To use this feature, you must be in one of the four letter modes (P, S, A, or M). Go to your custom menu settings and look for bracketing/flash. Then you need to select whether you want to bracket for the exposure (AE), white balance (WB), or active D-lighting (ADL). Please refer to your user manual for specific settings how to use exposure bracketing on your camera.
3. Active D-lighting - active d-lighting is used to help balance elements that are shaded in the foreground. It utilizes technology that optimizes high contrast images to restore shadow and highlight details that are often lost between bright and dark areas of the image. It can also readjust mid-tones, making the image look more natural. Using matrix metering in combination with active d-lighting can help balance photo exposures while maintaining detail. To enable the active d-lighting, go to your custom menu settings. You can active the d-lighting settings in your camera before taking the picture or after taking it, in Nikon's optional camera retouch menu.
Monday, May 25, 2015
Rain photography
Thursday, May 14, 2015
Butterfly photography
Tuesday, May 12, 2015
Caldwell Zoo photography
Monday, May 11, 2015
Taking better photos with your DSLR: Series 3
In this series on how to take better photos using a DSLR camera, I will quickly touch on camera settings, image editing processes and ND filters. By maximizing the capabilities of your camera, you can get vibrant and professional looking photos. These settings are based on what I use for my Nikon DSLR camera.
What formats should I shoot in?
There are several formats you can shoot in. I recommend shooting in JPEG (fine) and RAW image formats. You can set your image format to RAW if you want to edit them later, otherwise for quick shots, you can use JPEG fine quality. I always shoot in RAW format, so I can edit the images in Photoshop later.
What about color and post-processing?
I try get the image as close to what I want by adjust the settings on my camera. To do this, I mostly adjust the exposure and saturation settings on my camera. Under menu, go to optimize image, then custom. There, you can customize the saturation, hue adjustment, color mode, etc. I like to enhance the saturation. There is also an exposure button on top of the camera (+/- button). You can increase or decrease the exposure manually to help make the image lighter or darker depending on the lighting conditions you are working with. Finally, I do some fine tuning in Photoshop to get the results I want. I use Adobe Camera Raw into Photoshop. I start out with a pretty natural rendition of a given scene, then I might pump up the colors, warm things up, or cool things off. If you don’t have Adobe Photoshop or Lightroom, there are some free software options you can try: PicMonkey, Picasa, or Gimp.
What about camera filters to enhance my image?
You can also try using neutral density filters (or ND filters) to reduce the amount of light entering the lens on a very bright day. For example, a polarizer filter is used to help darken skies, increase the saturation, and also help reduce reflections from water surfaces. I find the polarizer filter is especially helpful with correcting an overexposed sky.
Subscribe to:
Posts (Atom)


